Introduction
Large LLMs (LLMs) like ChatGPT have revolutionized the field of natural language processing, enabling machines to understand and generate human-like text. While they have found extensive applications in various domains, one intriguing and practical use case is their ability to assist in writing VBA (Visual Basic for Applications) code for Excel. In this blog, we will explore how LLMs can streamline the process of VBA code development, enhance productivity, and help developers overcome coding challenges.
Generally, although some see the rise of AI as a threat to jobs and the potential cause of the redundancy of a large portion of our workforce, the AI revolution can be seen as an economic driver that equips the workforce with a continuously developing skillset, allows us to focus on more impactful aspects of our jobs, and will lead to the creation of new jobs and industry. As we navigate the uncertain landscape of an economy infused with AI, one thing is for certain, those who utilize these technologies to the fullest of their potential will have the best chance of success.
Understanding VBA and LLMs
VBA is a programming language primarily used for automating tasks in Microsoft Office applications like Excel, Word, and Access. It allows developers to write macros, create custom functions, and automate repetitive operations within these applications. However, VBA coding can be complex, requiring a deep understanding of the language syntax, object models, and specific application APIs. In Excel, VBA coding is used to develop Macros that are typically employed by users to automate repetitive and time-consuming tasks. The following examples are common use cases for using VBA code-based Macros:
- Data manipulation and cleaning
- Automating Formatting
- Workflow Automation
- Automating Data Entry
- Report generation
LLMs like ChatGPT can serve as valuable companions for VBA developers. By leveraging the vast amount of text data they are trained on, these models can generate relevant code snippets, provide suggestions, and even assist in debugging. Developers can interact with the LLM, posing questions or describing their requirements, and receive tailored responses that aid in VBA code development. When used correctly, LLMs can facilitate even a novice Excel user to develop complex VBA code, and expert users to reduce code development time.
Further information on using Macros and writing VBA can be found here: Getting started with VBA in Office | Microsoft Learn
Proper Use of LLMs
While extremely useful, no LLM is perfect and they should be used as a supplementary tool in VBA code development, not as a single source of truth. To reduce the likelihood of errors and increase the likelihood of achieving the desired outcome, the following steps should be taken:
- Correct Prompting: Providing clear and specific instructions and contextual prompts is crucial to getting accurate code output. Ambiguous or poorly defined prompts can result in undesired code.
- Code Auditing: LLMs are not perfect, and they can produce incorrect or nonsensical code, especially if the instructions are ambiguous or incomplete. Always review and validate the generated code carefully.
- Understanding the Security Risk: Using LLMs to write code may inadvertently lead to the generation of vulnerable or insecure code. Be cautious when using the model for security-sensitive applications and ensure proper validation and testing.
- Testing and Validation: Generated code should undergo rigorous testing and validation to ensure it meets the desired functionality and adheres to coding standards.
- Ensure Data Privacy: Be cautious when using LLMs with sensitive data in the prompts. Avoid sending sensitive or confidential information to the model to maintain data privacy.
Examples
Below are three simple examples of common use cases for Excel Macros and how to use LLMs (specifically GPT-3) to write the underlying VBA Code. Follow the steps below to run the code that GPT-3 produced in response to the prompts:
- Open the Excel workbook.
- Press ALT + F11 to open the Visual Basic for Applications (VBA) editor.
- Click Insert in the top menu and then choose Module.
- Copy and paste the provided VBA code into the new module window.
- Close the VBA editor.
- Press ALT + F8 to open the “Macro” dialog box.
- Select the macro from the list and click Run.
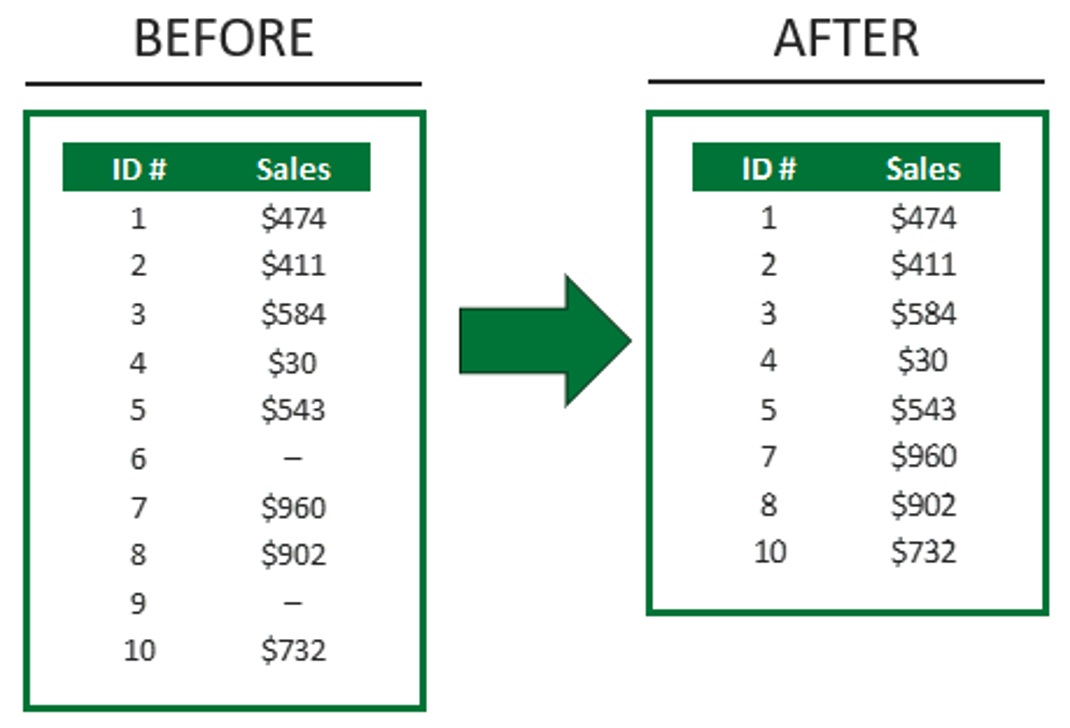
EXAMPLE 1: Cleaning Data – Eliminating Unnecessary Data Points
PROBLEM: You have a data table that contains a list of sales in which you want to eliminate all the entries that are $0.00.
PROMPT: “Using VBA code, write an Excel Macro that deletes all the data points that = 0 in the range B2:B10 on the tab called Sheet 1”.
OUTPUTTED VBA CODE:
Sub DeleteZeroDataPoints()
Dim ws As Worksheet
Dim rng As Range
Dim cell As Range
‘ Set the worksheet to operate on (change “Sheet1” to the desired sheet name)
Set ws = ThisWorkbook.Worksheets(“Sheet1”)
‘ Set the range to check for zero values
Set rng = ws.Range(“B2:B10 “)
‘ Loop through each cell in the range
For Each cell In rng
If cell.Value = 0 Then
‘ Delete the row if the value is 0
cell.EntireRow.Delete
End If
Next cell
End Sub
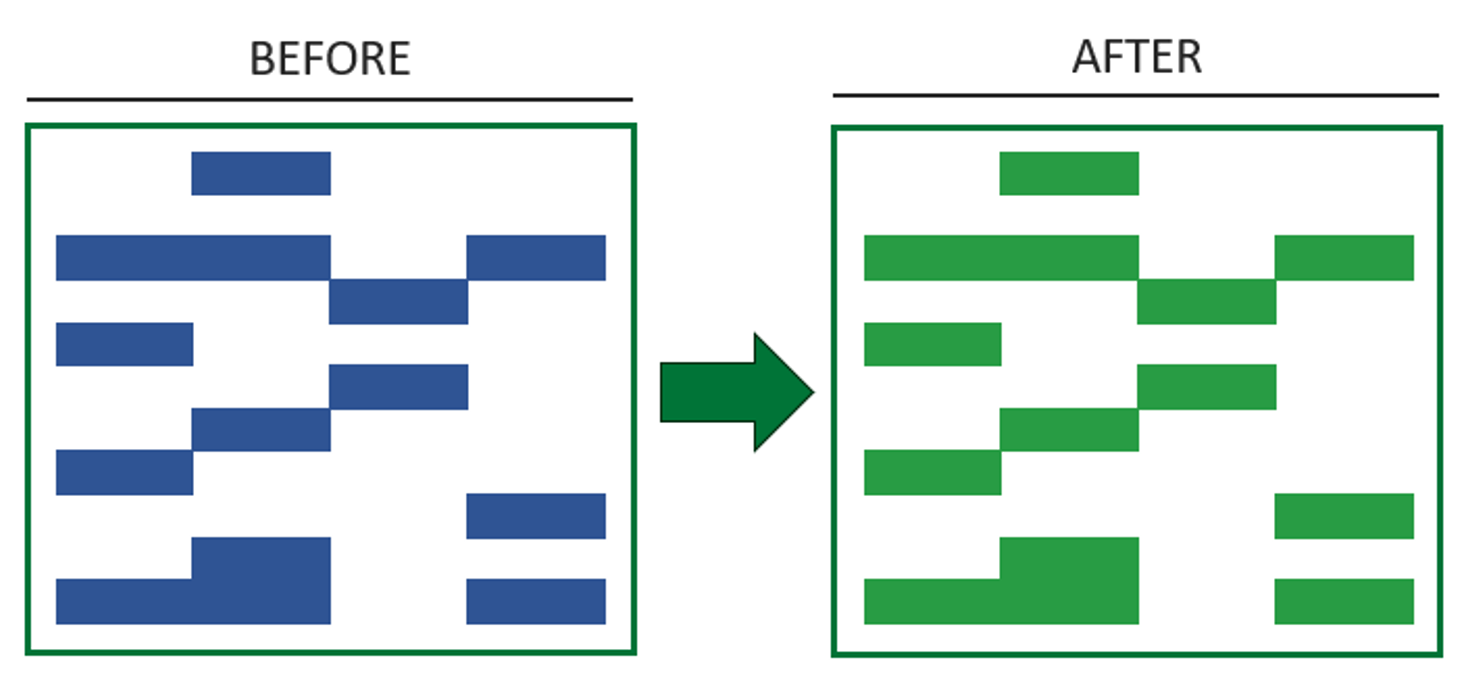
EXAMPLE 2: Automating Formatting – Recolouring Cells
PROBLEM: You have an Excel file with blue shading applied throughout however, you want to change all the cells with dark blue shading to dark green shading.
PROMPT: “Using VBA code, write an Excel Macro that changes the colour of all cells in the excel file with the RGB code of (R48, G84, B150) into (R42, G156, B61).”
OUTPUTTED CODE:
Sub ChangeCellColor()
Dim ws As Worksheet
Dim cell As Range
Dim targetColor As Long
Dim replacementColor As Long
‘ Set the RGB values for the target and replacement colors
targetColor = RGB(48, 84, 150)
replacementColor = RGB(42, 156, 61)
‘ Specify the worksheet where you want to change the cell color (change “Sheet1” to your desired sheet name)
Set ws = ThisWorkbook.Worksheets(“Sheet1”)
‘ Loop through all cells in the worksheet and change the color if it matches the target color
For Each cell In ws.UsedRange
If cell.Interior.Color = targetColor Then
cell.Interior.Color = replacementColor
End If
Next cell
End Sub
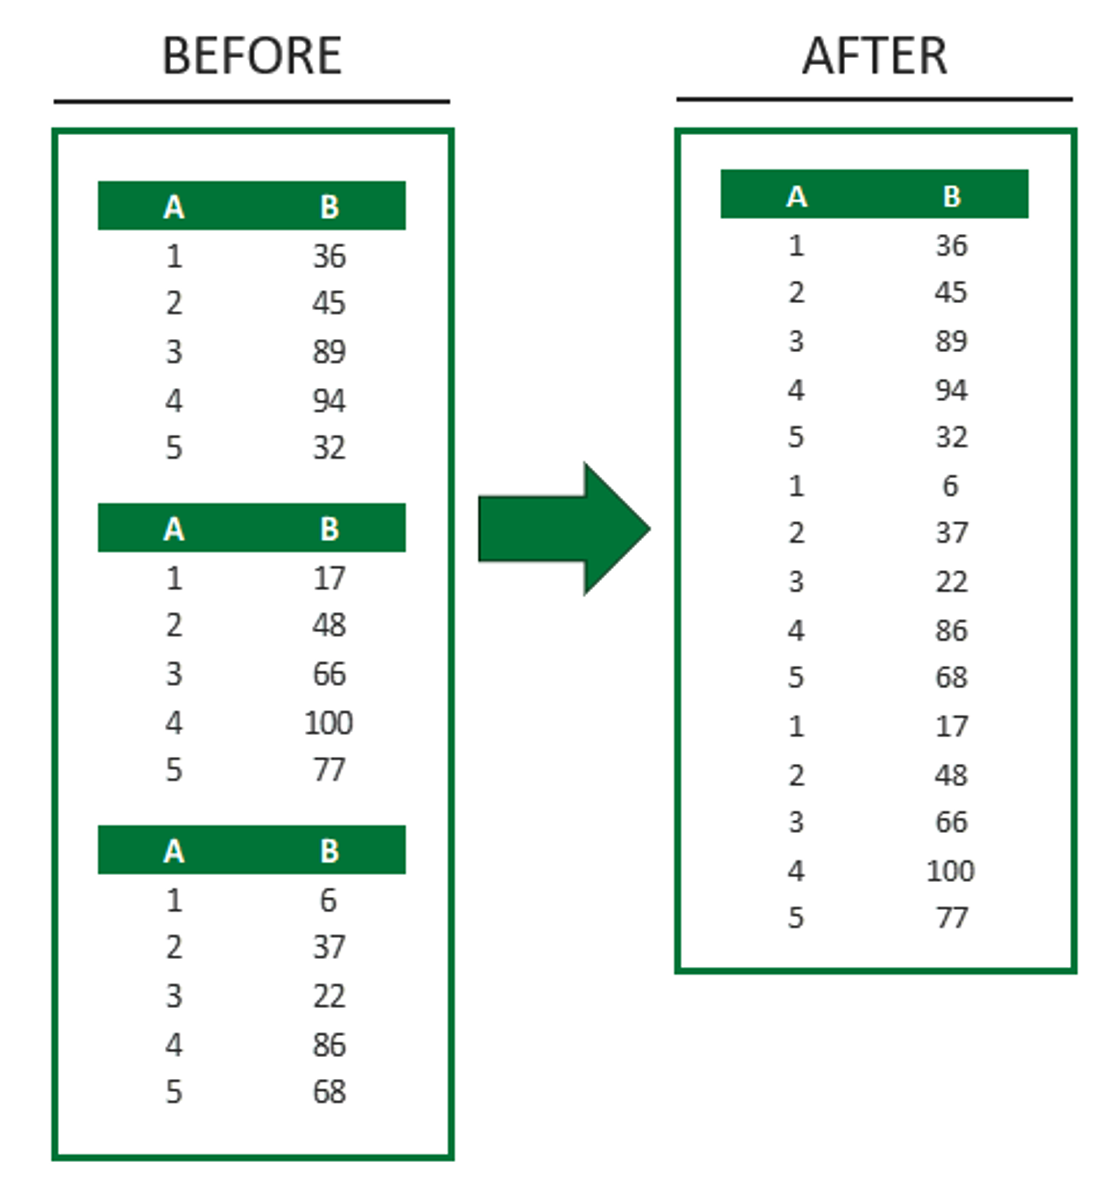
EXAMPLE 3: Workflow Automation – Combining Tables
PROBLEM: You have an Excel file with tables existing across multiple sheets and you would like to combine these tables into a consolidated table on a new sheet.
PROMPT: “Using VBA code, write and Excel Macro that consolidates the data from tables from each sheet onto a new consolidated tab with the headers A and B in columns A and B. These tables exist in columns A and B and include a header row but not a total row, do not copy the header rows.”
OUTPUTTED CODE:
Sub ConsolidateDataWithHeaders()
Dim wsConsolidated As Worksheet
Dim ws As Worksheet
Dim lastRow As Long, targetRow As Long
‘ Set the consolidated sheet where the data will be copied
Set wsConsolidated = ThisWorkbook.Sheets.Add(After:=ThisWorkbook.Sheets(ThisWorkbook.Sheets.Count))
wsConsolidated.Name = “ConsolidatedData”
‘ Write headers in the consolidated sheet
wsConsolidated.Range(“A1”).Value = “A”
wsConsolidated.Range(“B1”).Value = “B”
‘ Loop through each sheet in the workbook
For Each ws In ThisWorkbook.Sheets
‘ Skip the consolidated sheet itself
If ws.Name <> wsConsolidated.Name Then
‘ Find the last row in columns A and B of the current sheet
lastRow = ws.Cells(ws.Rows.Count, “A”).End(xlUp).Row
‘ Find the last row in the consolidated sheet
targetRow = wsConsolidated.Cells(wsConsolidated.Rows.Count, “A”).End(xlUp).Row + 1
‘ Copy data from columns A and B, excluding the header row, to the consolidated sheet
ws.Range(“A2:A” & lastRow).Copy wsConsolidated.Range(“A” & targetRow)
ws.Range(“B2:B” & lastRow).Copy wsConsolidated.Range(“B” & targetRow)
End If
Next ws
‘ Autofit columns in the consolidated sheet for better readability
wsConsolidated.Columns.AutoFit
End Sub